We will see in this article how to configure pfSense with two (or more) Internet connections that can be used in load balancing (active-active) or fail-over (active-passive) mode.
These configurations allow to increase the available bandwidth for Internet access or to ensure continuity of service in case of failure of the primary link, for example.
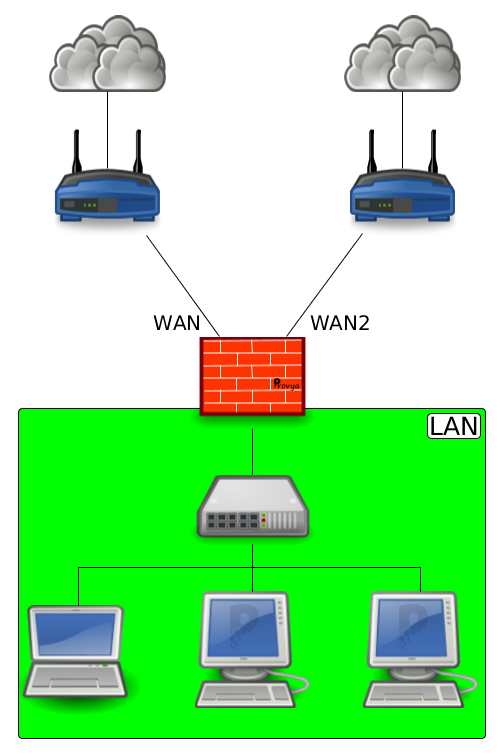
Network Diagram
How it works?
There are 3 ways to modify the routing in pfSense :
- forcing the gateway in the firewall rules: force routing for a specific firewall rule . For this configuration you can choose a gateway or a group of gateways.
- configuring a route: force routing for a specific destination IP address or range of IP addresses. For this configuration you can choose a gateway, but not a group of gateways.
- configuring a default gateway or group of gateways: by default, all outgoing traffic will use this gateway (more exactly, all traffic to a network unknown of pfSense).
Prerequisites [1/2]: Having at least 2 WAN interfaces
In our case, the first Internet link is connected on the “WAN” interface, the second Internet link is connected on the “WAN2” interface.
Example of configuration obtained:

The configuration of the WAN and WAN2 interfaces are not within the scope of this article.
It does not matter whether these interfaces are configured as static or dynamic (DHCP) IP addresses.
What is important is that you have 2 interfaces configured for your Internet connections.
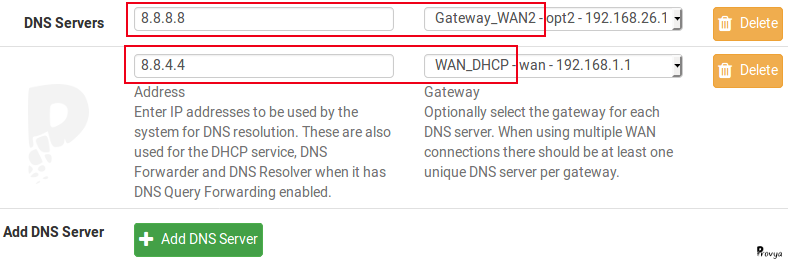
Prerequisites [2/2]: Having a DNS server for each WAN gateway
If one of the Internet links is lost, it is important that DNS queries continue to work.
That’s why at least one DNS server must be defined per WAN gateway.
Navigate to System > General Setup:
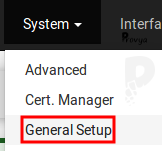
The configuration is done in the “DNS Server Settings” section.
For example, if using the Google DNS:
Let’s start the configuration.
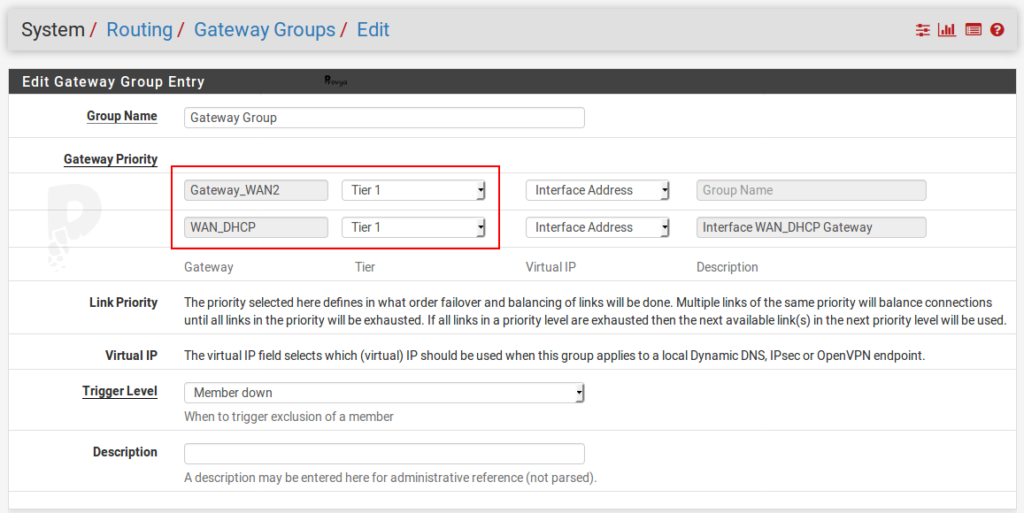
1. Creating a gateway group
We create a gateway group including the WAN and WAN2 interfaces.
Navigate to System > Routing:

Navigate to the Gateway Groups tab and then click on the “+ Add” button.
The fields to be filled in are the following:
- Group name: the name of the gateway group. Space or special characters are not allowed.
- Gateway Priority: for each gateway, we give a priority of use. The lowest priority always wins.
How it works: if for the WAN you choose a Tier 1 priority and for the WAN2 a Tier 2 priority, then the traffic is sent exclusively to the WAN gateway. The traffic is sent to the WAN2 gateway only if the WAN interface is down.
So, if you want to split the bandwidth between your 2 Internet connections, you must choose the same priority level.
If you want to configure an Internet connection as backup of a main one, then you have to play with the priority level.
pfSense manages up to 5 priority levels from “Tier 1” (highest priority) to “Tier 5” (lowest priority).
In our example, we want to configure load balancing, so we choose “Tier 1” for WAN and for WAN2. - Virtual IP: on each interface, you can choose the IP address with which pfSense will send its packets.
It could be the IP address of the interface or a virtual IP address. This option is useful if you have 2 redundant pfSense, for example (see our article [pfSense] Configuring High Availability). - Trigger Level: allows you to define the trigger that will allow pfSense to choose when to switch to a link with a lower priority.
There are 4 available values:- Member down: when a gateway is considered unreachable (i.e. when the associated monitoring IP address is no longer reachable by a ping).
- Packet Loss: when the maximum packet loss rate configured for this gateway is reached.
- High Latency: when the maximum latency set for this gateway is reached.
- Packet Loss or High Latency: when the maximum packet loss rate or latency is reached.
These parameters (maximum packet loss rate, maximum latency, etc.) are defined in the gateway configuration.
In our example, we choose “Member down”.
We save the configuration and then click on the “Apply changes” button.
2. Forcing the traffic
Navigate to Firewall > Rules:

Go on the LAN tab and edit the filter rules.
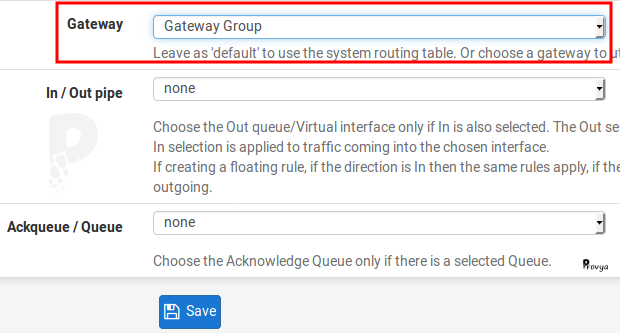
On each rule, go to the advanced options (“Display Advanced” button) :
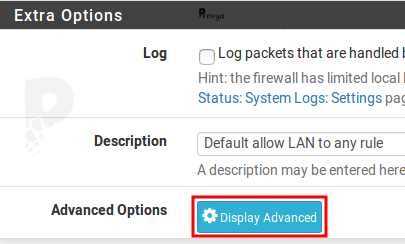
At the bottom of the page, choose the group of gateways in the Gateway field:
It is necessary to perform this configuration on all the filtering rules of your LAN interface (or your local interfaces more generally).
3. Configuring the services
OpenVPN server configuration
If an OpenVPN server is configured on the pfSense, it is necessary to modify the service listening interface (normally “WAN”) to replace it by the gateway group.
This modification is done in “OpenVPN” > “Servers”.
For more information about OpenVPN service configuration, please read:
[pfSense] Configuring a Site-to-Site OpenVPN Instance
[pfSense] Secure remote access for your home-office workers with OpenVPN
IPsec configuration
If an IPsec VPN is configured on the pfSense, it is necessary to modify the listening interface (normally “WAN”) to replace it by the gateway group.
This modification is done in “VPN” > “IPsec”. The modification is done on phase 1.
For more information about IPsec VPN configuration, please read:
[pfSense] Configuring a Site-to-Site IPsec VPN
4. Load Balancing advanced concepts
It is possible to define weights for each gateway so the load balancing could be inequal. It is the right solution if we want to send more traffic on one connection than on another.
These weights are defined from 1 to 30. By default, the weight of each gateway is 1.
The operating mode of the weights is as follows:
- if there are 2 gateways and they each has a weight of 1, then the bandwidth distribution will be 1/2 for each, i.e. 50%.
- if one has a weight of 1 and the second has a weight of 2, then the first will take 1/(1+2) = 33% of the traffic and the second 2/(1+2) = 67% of the traffic.
- if one has a weight of 5 and the other has a weight of 12, then the first will take 5/(5+12) = 30% of the traffic and the second 12/(5+12) = 70% of the traffic.
It is therefore possible to define outgoing traffic distribution ratios up to a ratio of 1 to 30.
If you want to to this customization, navigate to System > Routing:

Modify the gateway (pencil icon). Go to the advanced options (Display Advanced). Then modify the “Weight” field:
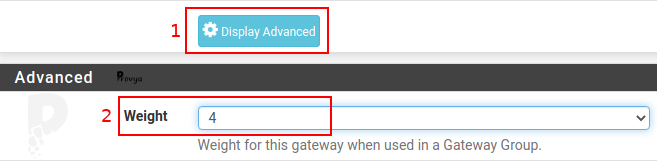
This feature is very useful if you want to combine 2 connections that don’t have the same speed (an ADSL connection and an fiber connection, for example).
5. Verifying the service
An easy way to check that the traffic is now passing through both Internet connections is to navigate to Status > Traffic Graph.
By selecting the WAN and WAN2 interfaces, you should see the traffic flowing through both links.
Then, to test the high availability of your links, several tests can be performed. Here are a few examples:
- disconnect and reconnect successively the network cable of the WAN interface then WAN2 ;
- downloading a file or pinging requests when you do the previous manipulation to see how well the traffic switches from one Internet link to the other.
At this step, think about making a backup of your pfSense configuration (Diagnostics > Backup & Restore) 😉
You can also think to configure AutoConfigBackup: [pfSense] Making automatic backups with AutoConfigBackup
Related topics
[pfSense] Configuring High Availability
[pfSense] Configuring a Site-to-Site IPsec VPN
[pfSense] Secure remote access for your home-office workers with OpenVPN
[pfSense] Making automatic backups with AutoConfigBackup
[pfSense] Upgrading pfSense (how-to)
Take a look at our firewalls
For pfSense or OPNsense
French quality
3 year warranty


Agora quero ver fazer NAT de entrada para 2 MX da rede interna. Não funciona nem a PAU
I want to see NAT for 2 MX. one for each gateway using gateway group
Hi,
If you want to configure one MX per gateway, the good solution is to play with the routing options.
Go to System > Routing, ‘Static Routes’ tab => you can set a static route for your MX server and choose which gateway this route applies to.
Guillaume
—
Provya