This article covers the configuration of an IPsec VPN between two firewalls.
The configuration is for a pfSense firewall, but the principle is applicable to all devices on the market supporting IPsec.
Network diagram
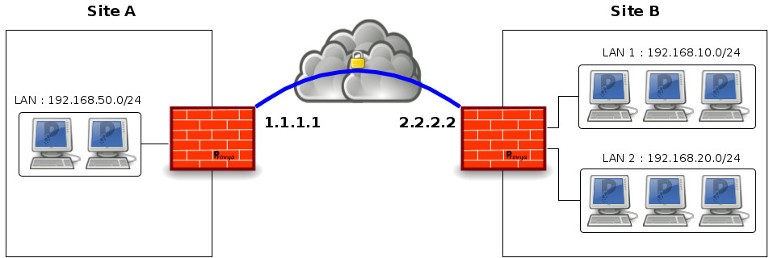
Site A:
- Public IP address: 1.1.1.1
- Local network: 192.168.50.0/24
Site B:
- Public IP address: 2.2.2.2
- Local networks: 192.168.10.0/24 and 192.168.20.0/24
We will present the configuration for Site A only.
The configuration for site B is easily deductible from that of site A.
1/3 – Configuring the phase 1
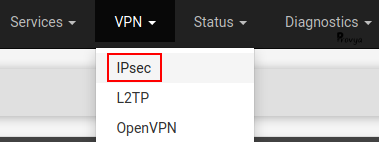
Go to VPN > IPsec:
Click on the “+ Add” button.
The fields to be filled in are the following:
- Disabled: check this case to disable this phase 1 (and thus to disable the IPsec VPN).
- Key Exchange version: allows you to choose the version of the IKE (Internet Key Exchange) protocol. Choose “IKEv2“. If the other peer does not support IKEv2 or if there is any doubt, we recommend to choose “Auto“.
- Internet Protocol: IPv4 or IPv6. In our case, it’s IPv4.
- Interface: WAN, normally. More generally the interface on which the IPsec peer should be reachable.
- Remote Gateway: public IP address of the remote peer. In our case, it’s 2.2.2.2.
- Description: only for administrative reference (not parsed).
- Authentication Method: There are two choices: pre-shared key (PSK) or certificate (RSA) authentication. The simplest and most common is to choose “Mutual PSK“.
- My identifier: our unique identifier. By default, this is the public IP address. So we leave the value “My IP address“.
- Peer identifier: the unique identifier of the remote peer. By default, this is the public IP address. So we leave the value “Peer IP address“.
- Pre-Shared Key: it must be the same on both peer. It can be what you want or you can let pfSense generate it. That’s what we do. We click on “Generate new Pre-Shared Key“.
- Encryption Algorithm: if both parties support AES-GCM, we recommend the use of AES256-GCM or AES128-GCM; this will provide a good level of encryption and will be compatible with the cryptographic acceleration offered by AES-NI. Otherwise, ideally choose AES with a key length of 256 bits. Finally, we keep SHA256 for hash function and 14 or 16 for the value of the Diffie-Hellman group (DH group – used for key exchange).
- Lifetime (Seconds): just keep the default value.
- Advanced Options: just keep the default values.
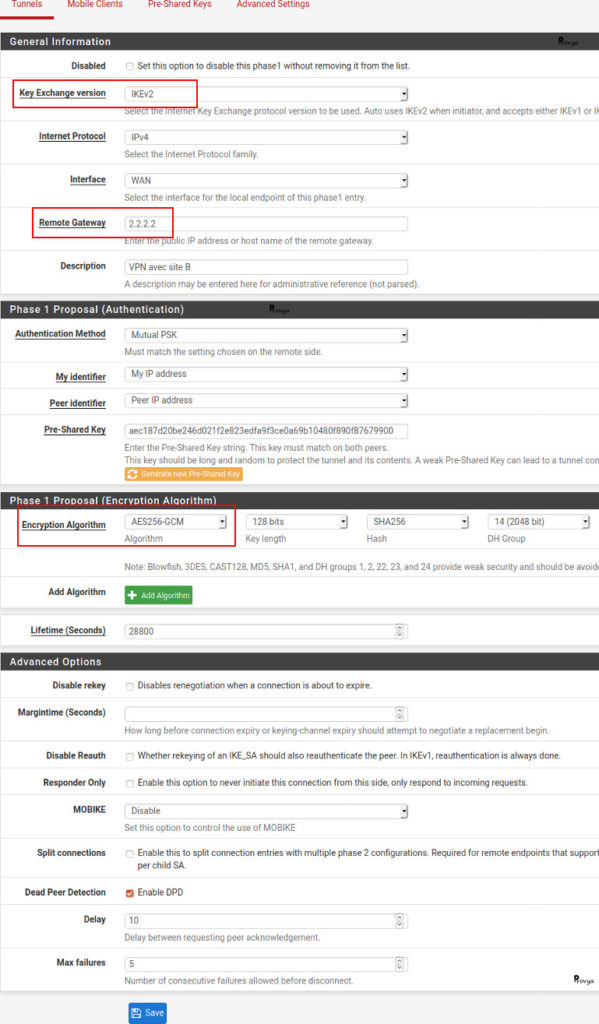
We click on the “Save” button. The phase 1 configuration is done.
2/3 – Configuring the phase 2
On the IPsec VPN tunnels page (where you should be right now), for our P1 entry we just created, we click successively on the “Show Phase 2 Entries (0)”, then on “+ Add P2”.
The fields to be filled in are the following:
- Disabled: check this case to disable this phase 2.
- Mode: keep the default value “Tunnel IPv4”.
- Local Network : the local subnet reachable through this VPN. In our case we choose “LAN subnet”.
- NAT/BINAT translation: if the actual Local Network must be hidden from the far side. It is very useful if site A and site B share the same subnet. In our case we choose “None”.
- Remote Network: in our case 192.168.10.0/24 ; then we will create another phase 2 with the other remote network (192.168.20.0/24).
- Description: only for administrative reference (not parsed).
- Protocol: choose ESP. AH is not really used. The AH protocol provides a mechanism for authentication only. The ESP protocol provides data confidentiality (encryption) and authentication.
- Encryption Algorithm: if both parties support AES-GCM, we recommend the use of AES256-GCM or AES128-GCM; this will provide a good level of encryption and will be compatible with the cryptographic acceleration offered by AES-NI. Otherwise, ideally choose AES with a key length of 256 bits. Finally, we keep SHA256 for hash function and 14 or 16 for the value of the Diffie-Hellman group (DH group – used for key exchange).
- Lifetime: just keep the default value.
- Automatically ping host : an IP address in the remote Phase 2 network to ping to keep the tunnel alive. It could be the private IP address of the remote firewall. In our case we choose 192.168.10.1.
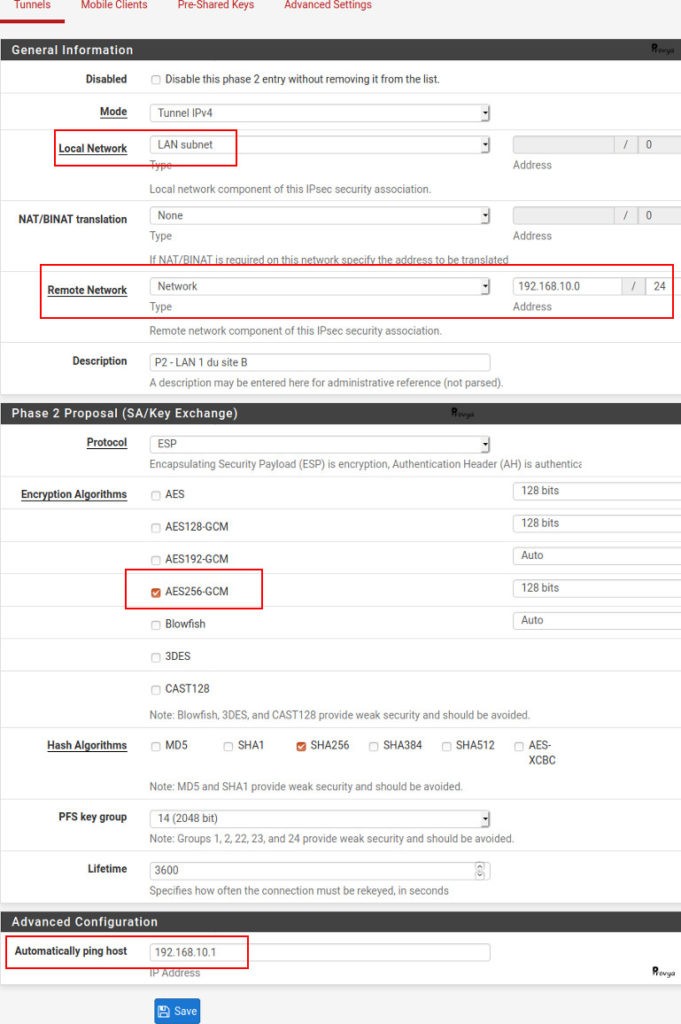
We click on the “Save” button. The first phase 2 configuration is done.
Then we start the second phase 2 configuration. This time we choose the other remote subnet (LAN 2 : 192.168.20.0/24). Keep in mind to change the value of the “Automatically ping host” parameter.
Once our second phase 2 created we can see the result:
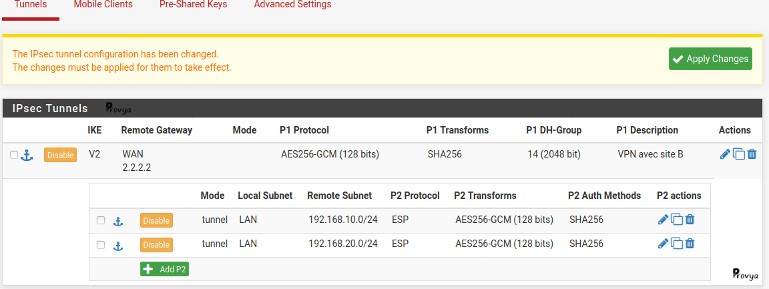
Don’t forget to click on the “Apply Changes” to validate the configuration.
The IPsec configuration is done.
3/3 – Configuring the firewall rules
There is at least two rules to configure: one rule for the traffic from the LAN to the IPsec VPN ; and another one for the traffic from the VPN to the LAN.
For the LAN rule, look for an example:

For the IPsec VPN rule, look for an example:

The configuration is done. It should work.
Related topics
[pfSense] Site-to-site IPsec VPN with overlapping subnets
[pfSense] Secure remote access for your home-office workers with OpenVPN
[pfSense] Configuring a Site-to-Site OpenVPN Instance
Did you like this article? Are you looking for professional equipment? Visit our shop.
Take a look at our SSD firewalls
For pfSense or OPNsense
Assembled in France
3 year warranty