pfSense offers several traffic shaping mechanisms. In this article we implement traffic shaping using the CBQ protocol.
Traffic shapers (like CBQ) allow to guarantee a minimum bandwidth for a usage.
At the opposite, Limiters allow to define a maximum bandwidth.
If you are looking for an easy solution to perform traffic shaping, CBQ is the perfect solution.
If you want to play with a more complex mechanism (with more tunable options), take a look at HFSC.
And then, if you want to know more about Limiters, please read our article: [pfSense] Limit maximum bandwidth per user with Limiters.
How traffic shaping works?
The implementation of traffic shaping is done in 2 steps:
- creating shaper queues: each queue is set with a bandwidth and a priority;
- creating assignment rules: which traffic will be prioritized by which queue.
Traffic shapers are usually created in pairs: one set of queues for incoming traffic (Download) and one set of queues for outgoing traffic (Upload).
With CBQ, traffic shapers are organized hierarchically: we can have a tree of queues nested under other queues.
Traffic shaping approach
The highest processing priority should always be given to applications requiring real-time processing. Typically, VoIP.
The next highest priority should always be given to TCP acknowledgements (ACKs).
It is important that these packets are given priority because otherwise the sender will consider that the packets sent were not correctly received and will re-send them. This, by snowball effect, will increase the load on the Internet link.
We consider that the bandwidth required for ACKs is 10 to 15% of the maximum speed offered in download (we will see at the end of the article how to refine this setting).
Finally, by naming convention, the queues always start with the letter “q” (e.g. qVoIP, qACK, qDefault, …).
For the naming of the queues, and in order to facilitate the readability, we recommend to use lowerCamelCase.
Use case: prioritizing VoIP on an Internet access
We work with the following case study: a company with a 3Mbps symmetrical Internet connection on which there is VoIP traffic to the SIP provider and data traffic (surfing, messaging, etc.).
The goal is to prioritize the telephony in order to guarantee the quality of communications and to have a dynamic distribution of the bandwidth.
We follow the KISS principle and set up the following three queues:
- qVoIP: the queue reserved for telephony
- qACK: the queue reserved for ACK packets
- qDefault: the default queue for the rest of the traffic
It is important to start with a small number of queues and simple assignment rules.
Then, proceed to fine-tuning if necessary.
The qVoip queue has the highest priority and a bandwidth of 1Mbps, which corresponds to about 10 simultaneous calls with the G.711 codec.
The qACK queue has the next highest priority and a bandwidth of 10% of the maximum download rate, i.e. 300Kbps.
Finally, the qDefault queue has a low priority (and the rest of the bandwidth) allowing the addition of queues with intermediate priorities if needed.
1. Queues configuration
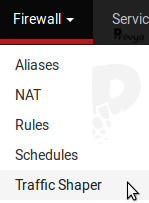
Navigate to Firewall > Traffic Shaper:
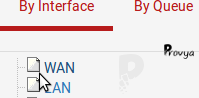
On the “By Interface” tab, click on “WAN”:
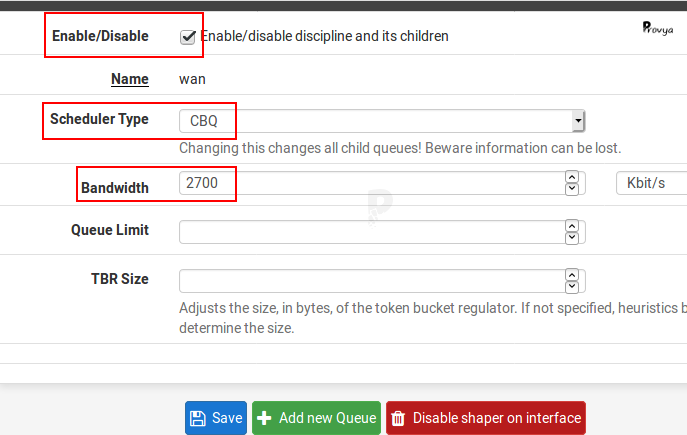
The items to be configured are the following:
- Enable/Disable: check the box to enable traffic prioritization on the WAN interface;
- Scheduler Type: choose “CBQ”;
- Bandwidth: indicate the maximum upload speed minus 10% (i.e. 2700Kbps);
- Queue Limit: leave empty (unless you want to modify the packet buffer size);
- TBR Size: leave empty.
Click on the “Save” button.
We are now going to create the queues. To do this, click on the “WAN” interface:
Then click on the “Add new Queue” button.
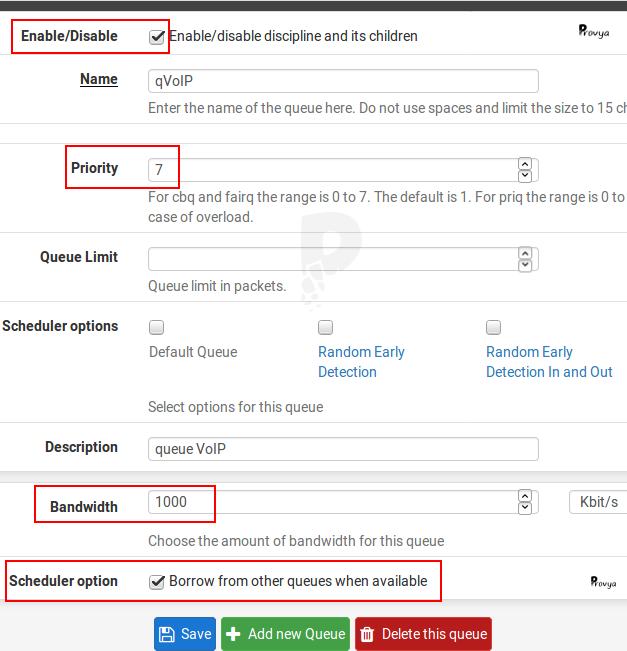
The items to be configured are the following:
- Enable/Disable: check the box to activate the queue;
- Queue Name: the name of the queue. Here, it is “qVoIP“;
- Priority: choose “7”;
- Queue Limit: leave empty (except if you want to modify the size of the packet buffer);
- Scheduler options: leave empty;
- Description: an optional description;
- Bandwidth: the bandwidth allocated to the queue. In our example, “1000 Kbps”;
- Scheduler specific options: check this box to enable dynamic bandwidth sharing for this queue.
Click on the “Save” button.
The first queue is created.
To create the next one, click on the WAN interface (the icon has taken the shape of a folder):
Then click on the “Add new Queue” button.
The items to be configured are the following:
- Enable/Disable: check the box to activate the queue;
- Queue Name: the name of the queue. Here, it is “qACK“;
- Priority: choose “6”;
- Queue Limit: leave empty (except if you want to modify the size of the packet buffer);
- Scheduler options: leave empty;
- Description: an optional description;
- Bandwidth: the bandwidth allocated to the queue. In our example, “300 Kbps”;
- Scheduler specific options: check this box to enable dynamic bandwidth sharing for this queue.
Click on the “Save” button.

The second queue is created.
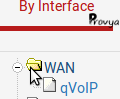
To create the third one, click again on the WAN interface.
Then click on the “Add new Queue” button.
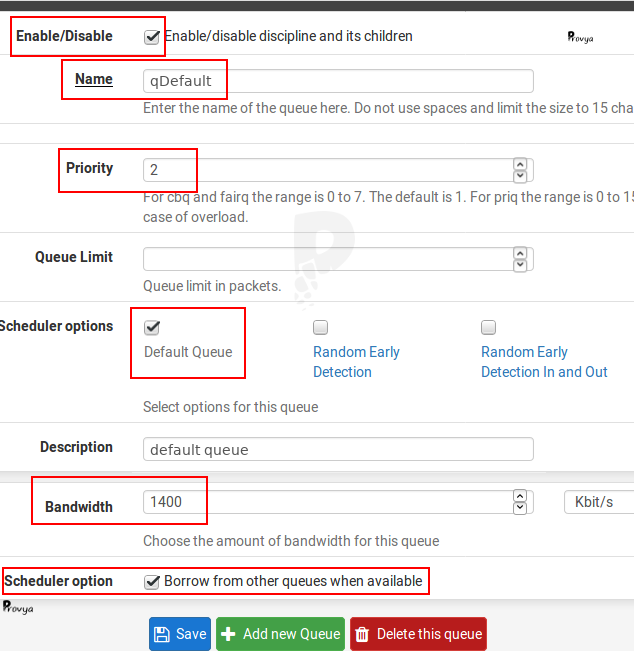
The items to be configured are the following:
- Enable/Disable: check the box to activate the queue;
- Queue Name: the name of the queue. Here, it is “qDefault“;
- Priority: choose “2”;
- Queue Limit: leave empty (except if you want to modify the size of the packet buffer);
- Scheduler options: check the “Default Queue” box;
- Description: an optional description;
- Bandwidth: the bandwidth allocated to the queue. In our example, “1400 Kbps”;
- Scheduler specific options: check this box to enable dynamic bandwidth sharing for this queue.
Click on the “Save” button.
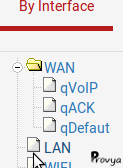
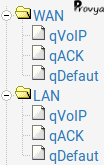
All the queues on the WAN side are created.
We have 3 queues:
- qVoIP: for traffic to and from the SIP provider
- qACK: for ACK traffic (TCP acknowledgement)
- qDefault: for the rest of the traffic
We now enable traffic prioritization on the LAN interface.
Click on “LAN” interface:
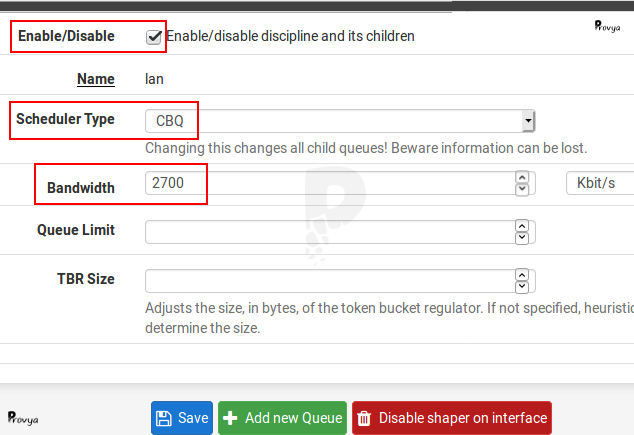
The items to be configured are the following:
- Enable/Disable: check the box to enable traffic prioritization on the LAN interface;
- Scheduler Type: choose “CBQ”;
- Bandwidth: indicate the maximum upload speed minus 10% (i.e. 2700Kbps);
- Queue Limit: leave empty (unless you want to modify the packet buffer size);
- TBR Size: leave empty.
Click on the “Save” button.
Now, duplicate the queues created on the WAN interface to the LAN interface.
Navigate to the “By Queue” tab:

Select the “qVoIP” queue, then, in the “LAN” section, choose “Clone Shaper on this interface“:
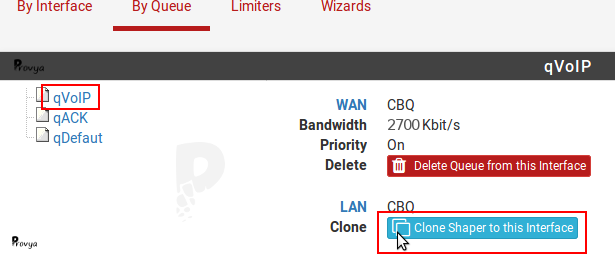
Proceed in the same way with the “qACK” and “qDefaut” queues.
All queues are created:
We validate the settings by clicking on the “Apply Changes” button:
2. Rules configuration
Now, create the assignment rules.
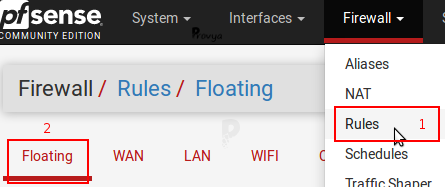
The configuration is done on the Firewall rules.
It can be done directly on the existing rules, or by creating generic rules on the “Floating” interface.
In our case, we don’t touch the existing rules. We create specific assignment rules on the “Floating” interface.
This is what we recommend to do systematically.
Thus, we do not mix the “firewall filtering” part with the “traffic prioritization rules” part.
Navigate to Firewall > Rules > Floating tab:
The method for creating firewall rules on the “Floating” tab is exactly the same as for any interface.
The only difference is the presence of the “Match” action.
The “Match” action means that no decision is made regarding the filtering.
If the packet matches the defined criteria (source or destination IP address, source or destination port, operating system, protocol, etc.), then the options defined in the “Advanced Options” section (such as assignment queues or gateway, for example) are applied.
Click on the “Add” button.
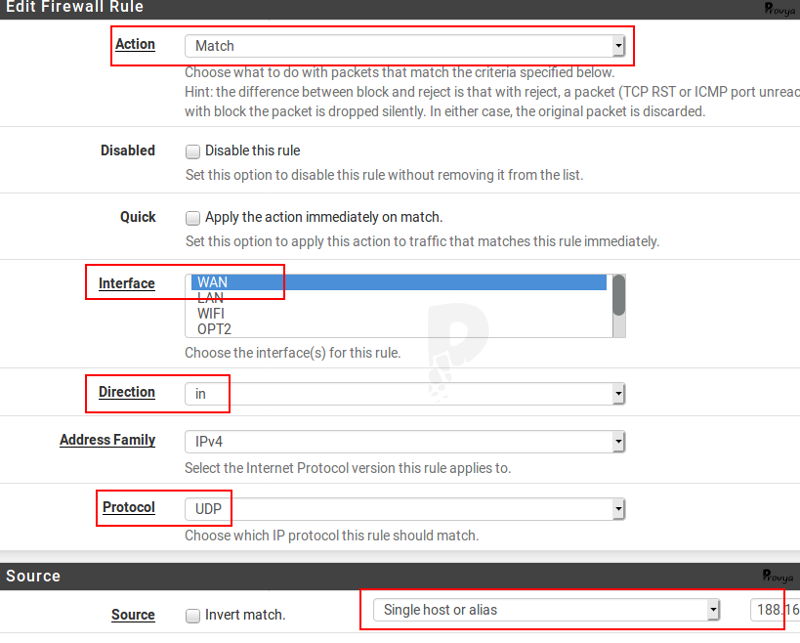
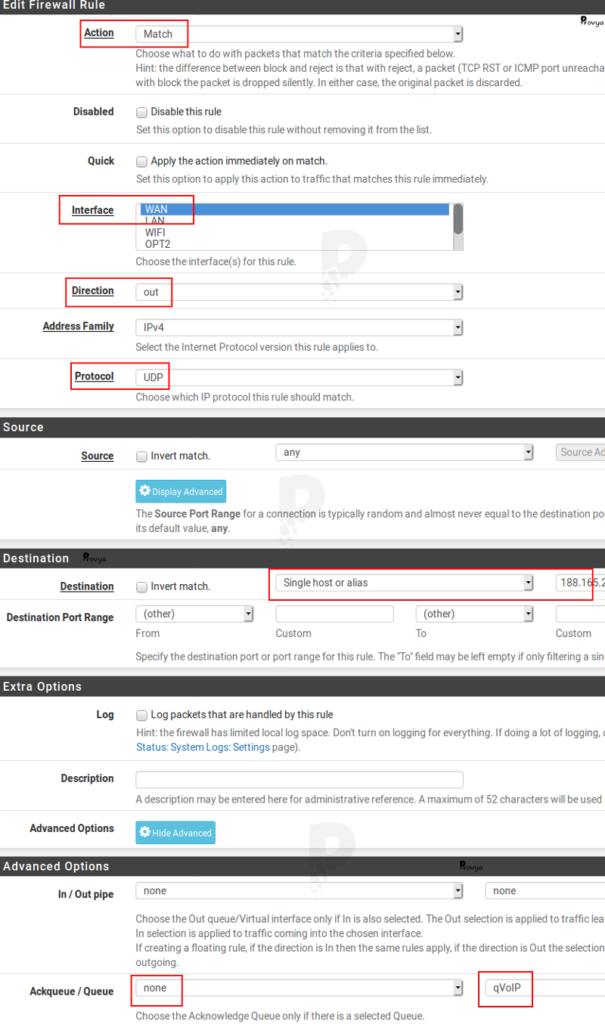
The items to be configured are the following:
- Action: choose “Match”
- Interface: choose “WAN”
- Direction: choose in (i.e. packets arriving on the WAN interface)
- Protocol: choose UDP (VoIP protocols like SIP and RTP use UDP by default)
- Source: choose “Single host or alias” and fill the IP address of the VoIP server
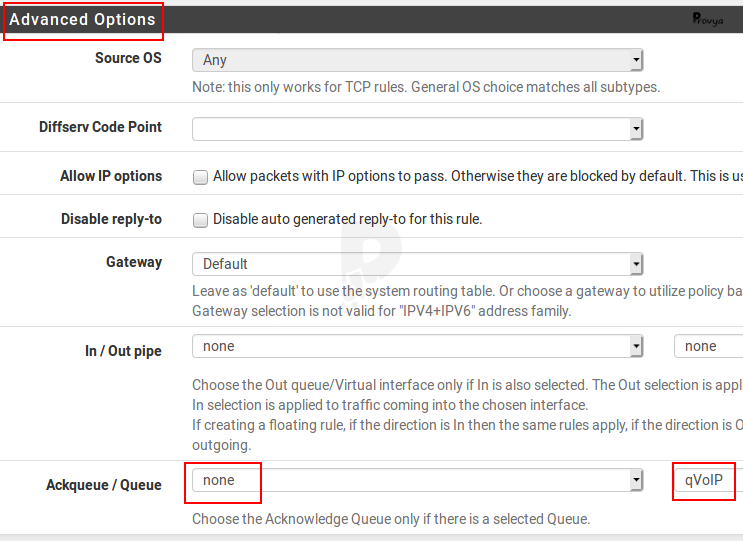
Then, in the “Advanced Options” section, click on the “Display Advanced” button and locate the “Ackqueue / Queue” line at the bottom.
The first drop-down list corresponds to the acknowledgement queue (ACK packets), the second drop-down list corresponds to the queue itself.
We can only choose an “Ackqueue” (first drop-down list), if we have chosen a queue (second drop-down list).
Here we choose the queue “qVoIP” and leave the Ackqueue at “none” (VoIP protocols like SIP and RTP use UDP).
Then click on “Save” to validate the rule.
The first assignment rule is created:

Create a second rule by clicking on the “Add” button.
The items to be configured are the following:
- Action: choose “Match”
- Interface: choose “WAN”
- Direction: choose out (i.e. packets outgoing through the WAN interface)
- Protocol: choose UDP
- Destination: choose “Single host or alias” and fill the IP address of the VoIP server
In the “Advanced Options” section, click on the “Display Advanced” button, then locate the “Ackqueue / Queue” line.
Leave the first drop-down list at “none“, and choose “qVoIP” for the second one.
Click on “Save” to validate the rule.
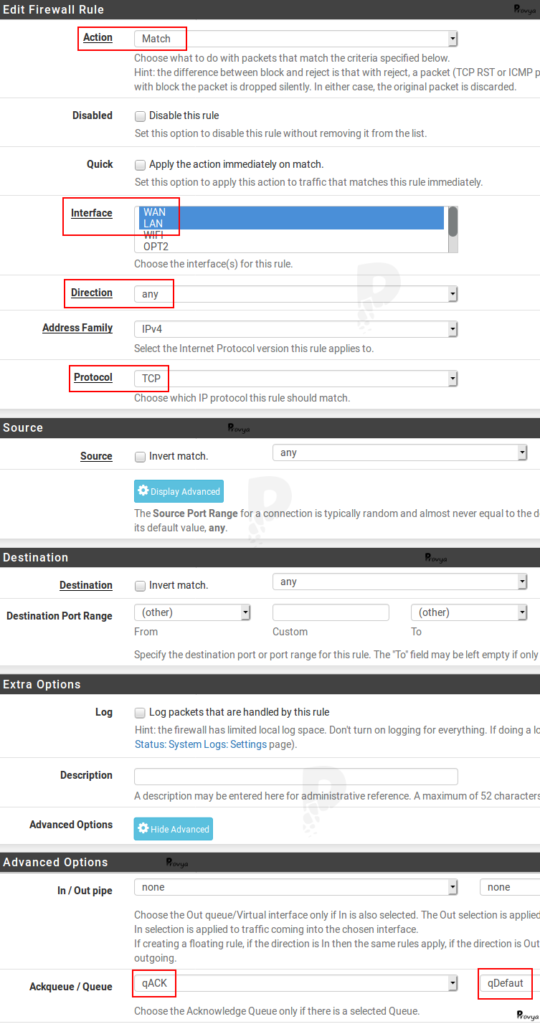
Finally create the last rule by clicking on the “Add” button.
The items to be configured are the following:
- Action: choose “Match”
- Interface: choose “WAN” and “LAN”
- Direction: choose any
- Protocol: choose TCP
In the “Advanced Options” section, click on the “Display Advanced” button, then locate the “Ackqueue / Queue” line.
Choose “qACK” for the first drop-down list and choose “qDefault” for the second one.
Then click on “Save” to validate the rule.
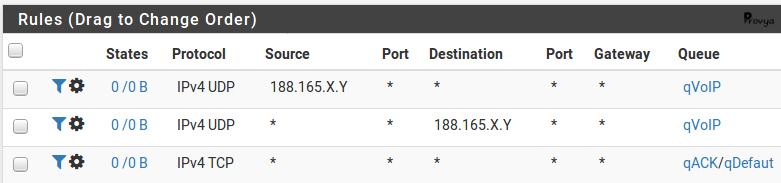
The three assignment rules are created.
Click on “Apply changes” to validate the configuration.
3. Reset state table
The traffic prioritization rules only apply to new connections. Current connections (shown in the state table) are not affected by the rules we just created.
So, in order for these rules to be taken into account, it is necessary to reset the state table.
Navigate to Diagnostics > States.
Click on the “Reset States” tab, check the “Reset the firewall state table” box and then click on the “Reset” button:
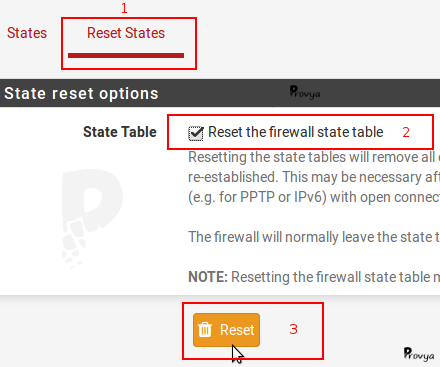
Note: the page will load endlessly.
This is normal behavior: the connection state between our browser and the pfSense has just been reset.
Just refresh the page to continue.
4. Troubleshooting
The queue usage statistics can be found in the Status > Queues menu:
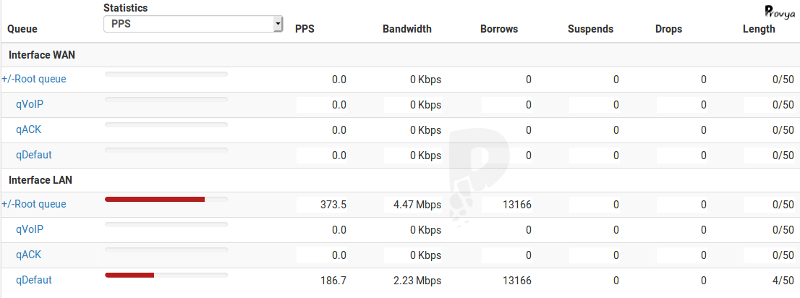
If we see “drops” of packets (penultimate column of the table) in one of the priority queues (qVoIP or qACK), it means that the bandwidth allocated to them is too low and that it should be increased.
On the other hand, having drops of packets in queues with a low priority (like qDefault) is normal: in the event of saturation of the Internet link, these queues do not have priority.
Traffic shaping is now configured on the pfSense!
Related topics
[pfSense] Limit maximum bandwidth per user with Limiters
[pfSense] Making automatic backups with AutoConfigBackup
[pfSense] Upgrading pfSense (how-to)
Take a look at our firewalls
For pfSense or OPNsense
3 year warranty
Free delivery