Normally each pfSense interface has its own IP subnet that must be unique. But it is possible de bridge multiple interfaces so that each network interface behaves like switch port.
For example, it can be useful to have a single IP subnet for the LAN and Wi-Fi networks, to have the same multicast network or to set up a transparent firewall on a network without having to change the existing IP subnet (by bridging the LAN and WAN interfaces, for example).
It is very easy to implement a network bridge between several interfaces on pfSense and still have filtering rules between these interfaces if desired.
In this article we will configure a network bridge between our LAN interface and our Wi-Fi interface.
This way both interfaces will have the same IP subnet and the same broadcast domain.
1. Preparing the bridge members
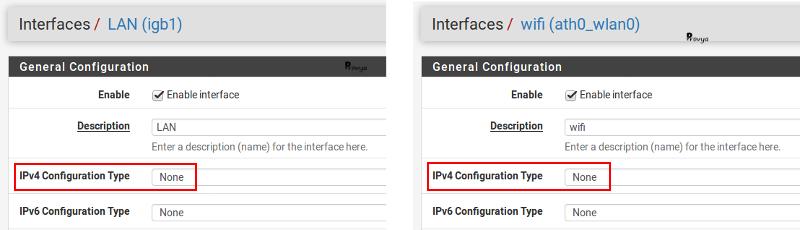
Each interface we want to add to our network bridge must be created and not have an IP address.
This point is important.
So, if we want to add our LAN interface to a network bridge, it is necessary to do the configuration from another interface (from the WAN interface, for example, on which we will have temporarily allowed access to the pfSense administration interface).
Example of configuration for the LAN and WIFI interfaces:
2. Configuring the network bridge
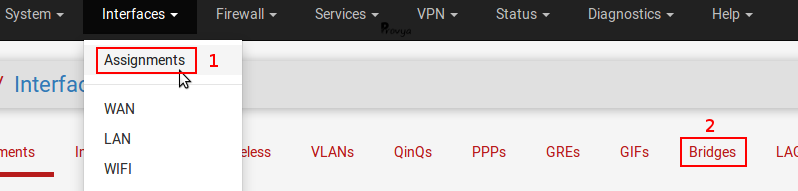
Navigate to Interfaces > Assignments > Bridges tab:
Click on the “+Add” button. The configuration is like following:
- Member Interfaces: in our case, LAN and WIFI.
- Description: optional field.
- Advanced Options: depending on the configuration, it can be useful to activate the Spanning Tree Protocol (STP). If you configure a bridge between two ethernet ports, activate this option. In our case, for a bridge between an ethernet and a wireless network, it is not necessary.
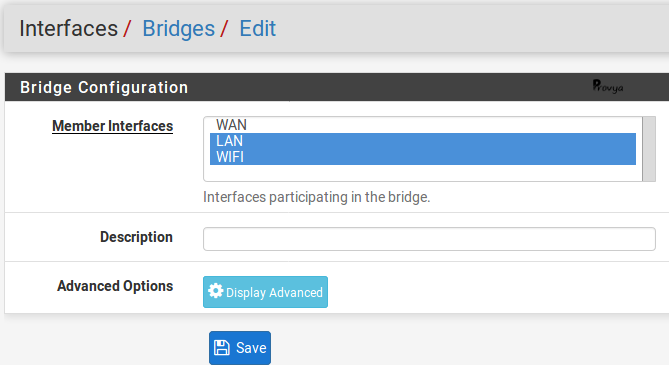
Click on the “Save” button.
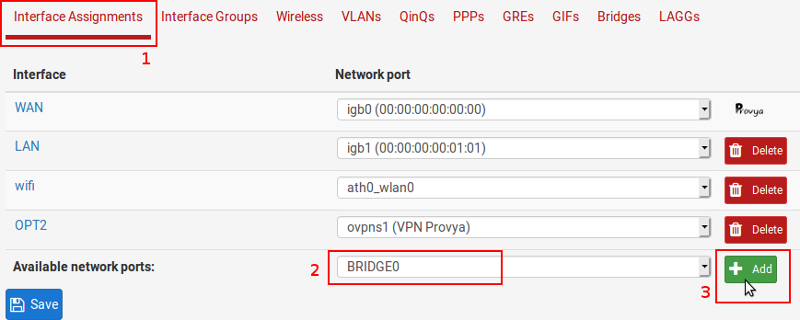
The network port “BRIDGE0” is created. Now we have to associate a logical interface to it in order to configure it.
If you want to know more about the concepts of “network port”, “physical interface”, “virtual interface and “logical interface”, please red our article :
[pfSense] How network interfaces work.
Navigate to Interface Assignments tab, then click on the “+Add” button after having selected the “BRIDGE0” interface:
Configure this interface: give it a name and an IP address.
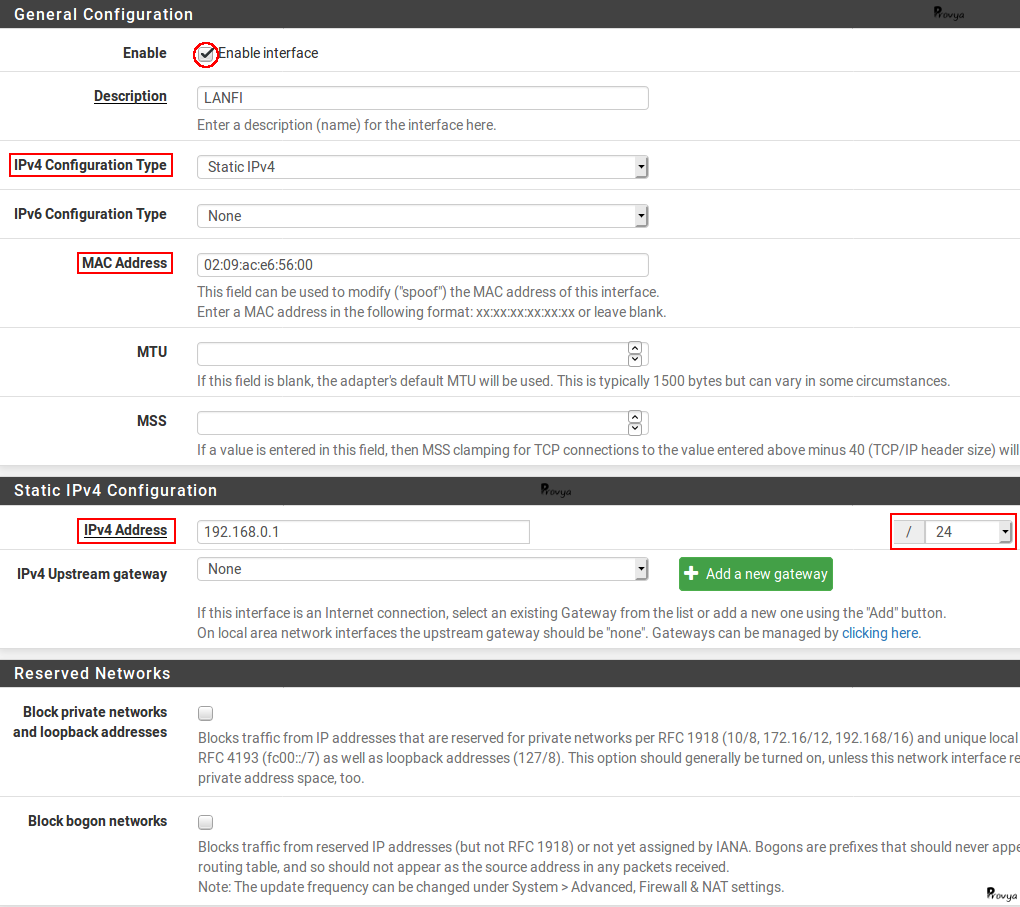
Caveat: you can notice on the screenshot we have set the MAC address.
The reason is if this field is left empty, the MAC address is randomly generated when the interface is created and when the firewall is restarted.
The problem is that computers running recent Windows (Vista and later) use the MAC address of the gateway as the network identifier.
So, if the MAC address changes, Windows computers will consider it as a new network and will ask their users to set it up as a private/public/etc network. By forcing the MAC address, we avoid this problem.
Our bridge network is created. The configuration of the different services (like DHCP, firewall rules, DNS, NTP, etc.) should be done on this interface (in our case “LANFI”).
There is one last important subtlety: filtering.
3. Filtering configuration (subtlety to know)
By default, pfSense applies filtering rules only on the interfaces of the bridge-network members and not on the bridge-network interface itself.
This means that in our case, by default, only the filtering rules defined on the LAN and WIFI interfaces are taken into account by pfSense. Any rules we might create on the LANFI interface will be ignored!
This default behavior allows to have different filtering rules for each member interface of the bridge.
It is possible to modify this behavior so that the filtering rules defined on the bridge-network interface are taken into account.
This modification can be done from the System > Advanced menu, System Tunables tab:
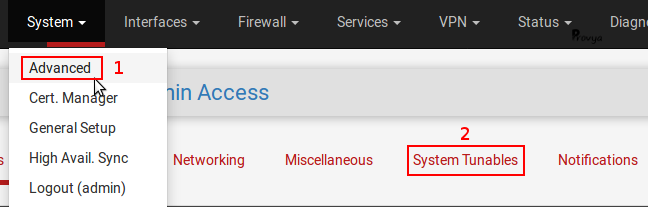
- net.link.bridge.pfil_member: enables filtering on the interface of each member of the bridge network when set to 1 ;
- net.link.bridge.pfil_bridge: enables filtering on the interface of the bridge network itself when set to 1.

So we have to set the value of the parameter net.link.bridge.pfil_bridge to 1 if we want to apply our filtering rules on the interface of the bridge-network.
Finally, we must keep in mind that only the bridge network has an IP address on its interface.
So if we want to apply filtering rules directly on each member interface of the bridge, we can work with the values LANFI_net and LANFI_address, but not LAN_net, WIFI_net, LAN_address and WIFI_address (because they are not defined).
4. Limits of service
There are some limitations to using a bridge network in pfSense. The main limitations or constraints are as follows:
Captive Portal
In order for the captive portal to work properly, it is important that the default gateway for clients is the IP address of the bridge network interface. Thus, it is not possible to implement a captive portal on a pfSense where the LAN and WAN are linked into a bridge network.
High availability
If you want to use a cluster of pfSense with bridging networks, it is essential that the Spanning Tree protocol is enabled on your switches and on the bridging network.
Multi-WAN
As with the captive portal, you must ensure that the default gateway for clients is the IP address of the bridge network interface. Otherwise, you may encounter an asymmetric routing problem.
Transparent proxy
Same thing, you have to make sure that the default gateway of the clients is the IP address of the bridge-network interface. Also, a package like Squid cannot work in a transparent firewall scenario where LAN and WAN interfaces are linked on the same network bridge.
That’s it! The network bridge is functional and you know the subtleties to know for its configuration.
Related topics
[pfSense] How network interfaces work
[pfSense] Limit maximum bandwidth per user with Limiters
[pfSense] Making automatic backups with AutoConfigBackup
Take a look at our firewalls
French manufacturing & quality
3 year warranty
Free delivery to USA, Canada, EU and UK