In this article we deal with user management and associated rights under pfSense.
User management allows to give user rights to access the pfSense WebGUI or to authenticate users on VPN connections.
User Management
There are two types of users:
- local users: administration (creation, modification, deletion) is performed locally on pfSense;
- external users: these users are authenticated by an authentication server (LDAP, Active Directory, …).
Users can be included in one or more groups. Rights are given either to the user directly or to the group. The rights applied to a group apply to all users who are members of the group.
The rights management allows you to define the access rights to the pfSense webGUI.
For each user (or group), it is possible to define which page they have access to.
The user management also allows authentication for VPN connections (OpenVPN or IPsec) for mobile users.
The users are managed from the Users tab under System > User Manager:
Rights management
Rights can be managed at user level or at group level.
Whether you want to give a right to a user or to a group, the order of operations is exactly the same: first you have to create the user or the group, then you have to modify this user (or this group) in order to give it the desired rights.
For each user, the rights assigned are listed in the Effective Privileges table. For each existing right, there is a description field that allows you to easily understand the associated scope.

On the screenshot above, we can see that the user has the right “WebCfg – Diagnostics: Halt system” which reads: allow access to the web interface (WebCfg), menu Diagnostics, page Halt System.
The description field is explicit.
It is possible to add new rights by clicking on the “+ Add” button under the table of rights already assigned.
The available rights are displayed in the form of a list. It is possible to select several items from the list by holding down the “Ctrl” key.
The Filter field allows you to filter on a specific term (you have to click on the “Filter” button at the bottom of the page to activate the filter).
Finally, the field with a blue background at the bottom of the page shows the description related to the selected right.
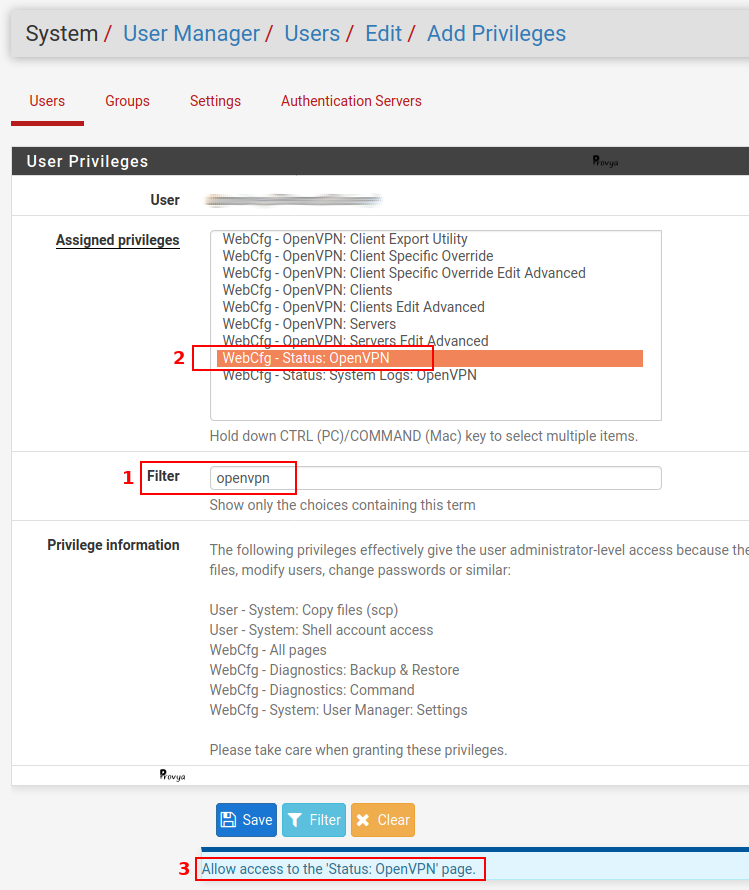
On the screenshot above, a search on the term “openvpn” has been done (1). The line “WebCfg – Status: OpenVPN” has been selected (2) and the description field on a blue background at the bottom of the page tells us that this right allows access to the ‘Status: OpenVPN’ page (3).
The main rights commonly used are the following:
- WebCfg – All Pages: gives access to all pages of the pfSense web interface.
- WebCfg – Dashboard (all): gives access only to the dashboard and all its associated functions (widgets, graphs, etc.).
- WebCfg – System: User Password Manager: gives access only to the page for changing your password and nothing else.
- User – System: Shell account access: gives the right to connect to pfSense via SSH. However, if the user does not have a root account, the functionalities offered will be limited…
Adding / Modifying a user
Adding a user is done by clicking on the “+ Add” button at the bottom right of the “Users” tab.
The configurable fields are the following:
- Disabled : check this box to disable the user without deleting it.
- Username: the user’s login. The username can be up to 16 characters long and must contain only letters, numbers, dots, hyphens or underscores.
- Password: the password and its confirmation.
- Full name: the user’s full name.
- Expiration date: it is possible to set an expiration date to the user account. If this field is left empty, the account will never expire. If you want to enter a date you have to pay attention to the format which is the American one (MM/DD/YYYY – Month/Day/Year).
- Custom Settings: allows you to modify the display parameters for the user such as the theme of the webGui, the behavior of the menu, the display order of the network interfaces, etc.
- Group membership: the user’s membership groups. A user can be a member of several groups. The rights of each group then apply to the user.
- Effective Privileges: this table allows you to assign rights directly to the user. Note: this table only appears when you edit the user.
- Certificate: allows the creation of a user certificate. Note: this section does not have the same display depending on whether the user is being created or modified. When modifying a user, it will be possible to associate an existing certificate with it. For more information on creating a certificate, see our article [pfSense] Certificate management for OpenVPN connections.
- Authorized keys: a public key for SSH authentication can be entered here. Thus, the user will be able to authenticate with his private key instead of his password.
- IPsec Pre-Shared Key: used only if you use a mobile IPsec VPN with a pre-shared key for non-XAuth authentication (Extended Authentication). Otherwise, this field must be left empty.
Adding / Modifying a group
Groups are the most convenient way to manage the rights assigned to users without having to manage them individually on a user-by-user basis.
A user will benefit from the cumulative rights of each group to which he belongs.
As with users, you must first create a group before you can assign rights to it.
You can add a group by clicking on the “+ Add” button at the bottom right of the “Groups” tab.
The configurable fields are the following:
- Group name: the name of the group. The group name can be up to 16 characters long and must contain only letters, numbers, dots, dashes or underscores.
- Scope: the scope of the group. Two values are possible: local or remote.
- Description: optional field for information only.
- Group Membership: the list of users who are members of the group.
- Assigned Privileges: this table allows you to assign rights to group members. Note: this table only appears when a group is modified.
Advanced options
The Settings tab allows you to configure two things: how long a session is valid and how users are authenticated.
Session timeout
By default, a session is valid for four hours (240 minutes). It is possible to reduce or increase the session validity time. The session duration is expressed in minutes.
It is also possible to make sure that sessions never expire by setting the value to 0.
Our recommendation is to have a maximum session validity of one hour.
Authentication Server
This option allows you to choose the primary authentication server. This can be a remote Radius or LDAP server, or the local pfSense database.
In the case, where authentication via a remote server is configured and this one is not accessible, the authentication will be done via the local database as a backup.
When authentication via a Radius or LDAP server is desired, the users and/or groups must also be defined on the firewall side so that the rights are correctly allocated. There is no real solution to dynamically obtain permissions from an authentication server.
Thus, for the rights assigned to a group to work, it is necessary that:
- the group exists on the remote authentication server;
- the same group (with the same name) exists locally on the firewall;
- pfSense can reach the authentication server and retrieve the list of groups.
That’s all folks about local user management on pfSense!
The authentication through an external server will be the subject of another detailed article.
Related topics
Take a look at our firewalls
For pfSense or OPNsense
3 year warranty
Free delivery to USA, Canada, EU and UK